Getting Started
This tutorial assumes that you already have some experience developing
Java code in Eclipse and using the built-in JUnit integration. It
also assumes that you have already followed the on-line instructions
to install the continuous testing feature into Eclipse.
This is
not a comprehensive reference to continuous testing features, but
should give you enough information to feel comfortable getting started
on your own. You can use the provided example code if you like, or
follow along using an existing or new project of your own. The
example given is contrived to show off many features of continuous
testing in a short time, and is not intended to be a model
of good development practice.
Creating a project
First, create a new java project called
"topten". For this example, we are developing a rudimentary software
library to help under-imaginative journalists and television writers
come up with "Top Ten" lists of anything imaginable. Create three
classes as follows. You should add the JUnit libraries to your
classpath now. (Or, if you're familiar with the technique, use Quick
Fix to add them once you've created the files).
- TopTen.java: A utility class for
picking the top N objects out of any list.
- Joke.java: A simple class for
storing the punchline to a joke.
- TopTenTest.java: A beginning
test suite for the TopTen class.
If you wish, remind yourself of how compile error notification and
JUnit integration work in Eclipse. Introduce a compile error into one
of your files, save it, and notice how it is flagged immediately with an icon
in the margin, with a wavy line in the code text, and with an entry in
the Problems view at the bottom of the screen. Fix the compile
error. Now, select your topten project, and from the main
menu, choose "Run As > JUnit Test". The JUnit view should pop up,
and a green bar run across the top as your tests run.
 Since you've already installed continuous testing, it's time to enable
it for our project. Right-click the topten project in the
Navigator view, and select "Properties".
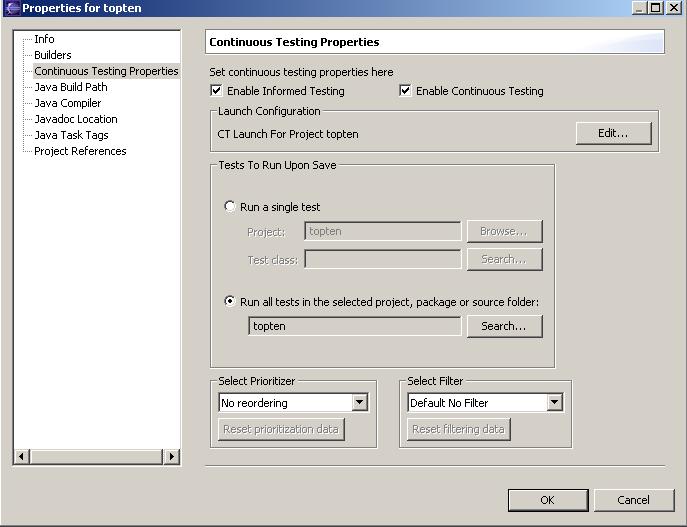
Now, in the selection list
on the left, choose "Continuous Testing Properties". A number of
controls will appear. For now, we just want to have the plugin run
every test in the project when a file in the project is saved. Select
"Enable Informed Testing" and "Enable Continuous Testing".
Now press "OK".
Since you've already installed continuous testing, it's time to enable
it for our project. Right-click the topten project in the
Navigator view, and select "Properties".
Now, in the selection list
on the left, choose "Continuous Testing Properties". A number of
controls will appear. For now, we just want to have the plugin run
every test in the project when a file in the project is saved. Select
"Enable Informed Testing" and "Enable Continuous Testing".
Now press "OK".
At this point, all the tests in your topten project will run. The Junit
result view will show the results of the tests. If you ever want to
keep a close eye on what
the continuous testing feature is doing, you could leave this view on
top. But for now, it's likely to be more distracting than useful.
Hide it by bringing another view to the front on top of it; perhaps
the Problems view. You should see that nothing else appears much
different than it did before you enabled continuous testing.
Congratulations! This means that the tests in your suite all pass.
There is one last thing you need to do to make continuous testing
useful. In the Problems view, click the "filters" button on the upper
right: it has three arrows pointing to the right. A dialog box will
appear. Look for the checkboxes labelled "Show items of type:" Make
sure that Test Failure is checked (by default, it most likely is
not). Now, go on to the next step, where we'll see continuous testing
in action.
 Since you've already installed continuous testing, it's time to enable
it for our project. Right-click the topten project in the
Navigator view, and select "Properties".
Now, in the selection list
on the left, choose "Continuous Testing Properties". A number of
controls will appear. For now, we just want to have the plugin run
every test in the project when a file in the project is saved. Select
"Enable Informed Testing" and "Enable Continuous Testing".
Now press "OK".
Since you've already installed continuous testing, it's time to enable
it for our project. Right-click the topten project in the
Navigator view, and select "Properties".
Now, in the selection list
on the left, choose "Continuous Testing Properties". A number of
controls will appear. For now, we just want to have the plugin run
every test in the project when a file in the project is saved. Select
"Enable Informed Testing" and "Enable Continuous Testing".
Now press "OK".